All software tools needed for this project have already been installed in the virtual machine, including Elasticsearch. To start Elasticsearch in the virtual machine, enter the following command:
sudo service elasticsearch start(You will need to start Elasticsearch using the above command whenever you power up your virtual machine in the future.)
Wait a few seconds while Elasticsearch is starting. Once Elasticsearch has started, you can test whether your Elasticsearch is running by sending an HTTP request to port 9200 on localhost:
curl -s -XGET 'localhost:9200/?pretty'which should give you a response like this:
{
      "name" : "Cp8oag6",
      "cluster_name" : "Elasticsearch",
      "cluster_uuid" : "AT69_T_DTp-1qgIJlatQqA",
      "version" : {
        "number" : "5.6.2",
        "build_hash" : "f27399d",
        "build_date" : "2016-03-30T09:51:41.449Z",
        "build_snapshot" : false,
        "lucene_version" : "6.6.1"
      },
      "tagline" : "You Know, for Search"
}
The primary goal of our first task it to brush up your Java programming knowledge. In this task, you will have to build a simple "Web crawler" in Java. When given a particular url, your crawler will retrieve the webpage and print the html text of the webpage to the console. If you are new to Java or if it has been a while since your last Java programming, first read A Crash Course from C++ to Java. This excellent tutorial explains the basics of Java, including how you can name, compile, and run your Java program. (It is okay to skip the parts on BlueJ in the tutorial, since we will not be using it.) If you are quite familiar with Java, but you just want to brush up on minor details quickly, you may want to read slides on Java instead. All basic tools needed for Java programming (e.g., javac and java) are available on our VM.
Now download the project1.zip file, which includes our skeleton Java code, GetWebpage.java for this task. The provided code takes a URL as the command-line parameter and simply prints the URL to console. Your task is to insert your own code to implement a simple Web crawler.
GetWebpage. Your program should take the url as the first command-line parameter. For example, a user should be able to execute your program like
java GetWebpage http://stackoverflow.com
http://stackoverflow.com should display the following:
<html><head><title>Object moved</title></head><body>
<h2>Object moved to <a href="https://stackoverflow.com/">here</a>.</h2>
</body></html>
In implementing your crawler, you may find java's URL class (http://docs.oracle.com/javase/8/docs/api/java/net/URL.html) useful.
Notes on editors for Java development: You can choose whatever editors you like for Java development. Options include:
vi and nano are available) to edit text files. Instead, you may use your favorite text editor
from your host OS (e.g., notepad) and transfer the edited file
to the VM through the shared directory. Remember that the shared directory from the host (e.g., C:\vm-shared
in Windows) is available at /mnt/sf_vm-shared in the VM,
which is symbolically linked at $HOME/shared.
curl commandGET /_cat/indices?vreturns all existing indices in the server.
We can issue a command to Elasticsearch through the REST API using the curl command. curl is a tool that makes it easy to send an HTTP command to a server and obtain the response from it. For example, if we want to send the above GET command
to the Elasticsearch server running in the local virtual machine (localhost) at port 9200, we need to run the following command:
curl -s -XGET 'localhost:9200/_cat/indices?v'At this point, the local Elasticsearch is likely to return a response like:
health status index uuid pri rep docs.count docs.deleted store.size pri.store.sizewhich simply means we have no indices yet in the server.
Now that you have learned the basics of Elasticsearch, you need to build our first index using our dataset.
data/simplewiki-abstract.json. This dataset is "succinct summaries" of all pages in the Simple English Wikipedia in the JSON format. More precisely, each line in the file corresponds to one wikipage in the Simple English Wikipedia. Each JSON object includes four "fields", title, abstract, URL, and sections, that corresponds to the title, a short summary, the URL, and the section titles of the page, respectively. Open the JSON file using your favorite text editor and explore the dataset to get familiar with the data. (Warning: this dataset is quite big (~100MB), so it may take a while to open it with a text editor. You may want to take a small subset of the data, say the first 1000 lines, and use the smaller file during exploration and initial development.)
Now, build an index named task2a using our Wikipedia dataset. Since we have a large number of documents to index, you may find the bulk API from Elasticsearch useful. To use the bulk API, you have to "preprocess" the wikipedia JSON file, so that each line of wikipage is preceded by an "index" command and the appropriate document id. We have include a Java skeleton code, ParseJSON.java, in the project1.zip that can be used for this purpose. The program includes the basic code to read a file with JSON data and parse it. Your job is to fill in your own code to generate an output file suitable for Elasticsearch bulk API.
In building your first index, make sure that
If your index is built correctly, the index should return the following documents for the given IDs.
| id | title | URL |
|---|---|---|
| 1 | April | https://simple.wikipedia.org/wiki/April |
| 34261 | 1.22.03.Acoustic | https://simple.wikipedia.org/wiki/1.22.03.Acoustic |
| 67380 | Ken Starr | https://simple.wikipedia.org/wiki/Ken_Starr |
| 91872 | Marking knife | https://simple.wikipedia.org/wiki/Marking_knife |
| 128604 | Tidal viloet | https://simple.wikipedia.org/wiki/Tidal_viloet |
curl -s -XGET "localhost:9200/task2a/wikipage/1?pretty"You should get a result like
   {
      "_index" : "task2a",
      "_type" : "wikipage",
      "_id" : "1",
      "_version" : 1,
      "found" : true,
      "_source" : {
        "abstract" : "April is the 4th month of the year, and comes between March and May. It is one of four months to have 30 days.",
        "title" : "April",
        "url" : "https://simple.wikipedia.org/wiki/April",
        "sections" : [
          "The Month",
          "April in poetry",
          "Events in April",
          "Fixed Events",
          "Moveable Events",
          "Selection of Historical Events",
          "Trivia",
          "References"
        ]
      }
    }
Also, your index should return the following number of matching documents for the corresponding queries on the default _all field:
| Query | # matching docs |
|---|---|
| information retrieval | 502 |
| the matrix | 69555 |
| algebra | 55 |
| elasticity | 9 |
| elizabeth | 202 |
| April 5 | 3487 |
| wrestler | 85 |
curl -s -XGET "localhost:9200/task2a/_search?q=information%20retrieval&pretty"
(Note that the white space between information and retrieval is URL encoded as %20 since the query is part of a URL.)
You should get a result like{
"took" : 13,
"timed_out" : false,
"_shards" : {
"total" : 5,
"successful" : 5,
"skipped" : 0,
"failed" : 0
},
"hits" : {
"total" : 502,
"max_score" : 17.103891,
"hits" : [
{
"_index" : "task2a",
"_type" : "wikipage",
"_id" : "111606",
"_score" : 17.103891,
"_source" : {
"abstract" : "Information retrieval is a field of Computer science that looks at how non-trivial data can be obtained from a collection of information resources. Commonly, either a full-text search is done, or the metadata which describes the resources is searched.",
"title" : "Information retrieval",
"url" : "https://simple.wikipedia.org/wiki/Information_retrieval",
"sections" : [
"Problem description",
"Different models",
"First dimension: the mathematical model",
"Second dimension: the properties of the model"
]
}
},
...
}
Note: Due to "Near Real-Time" nature of Elasticsearch (i.e., a document indexed by Elasticsearch may take a few seconds to show up in search results), if you issue your queries too quickly after building an index, you may get a slightly different result from what we show here. To make sure that all indexed documents show up in your result, you can use the "POST /_refresh" command. That is, you may want to issue the following command:
curl -s -XPOST 'localhost:9200/_refresh?pretty'through
curl before sending a query after building an index (credit to Brandon Shin).
Once you have successfully built your first Elasticsearch index, add the sequence of commands that (1) converts data/simplewiki-abstract.json file (make sure to use a relative path) into a file that can be loaded through bulk API (2) creates the task2a index and loads the data to the build.sh script in project1.zip. Eventually, you will have to submit the build.sh file as part of Project 1 submission.
Notes on CR/LF issue: If your host OS is Windows, you need to pay particular attention to how each line of a text file (including your script file) ends. By convention, Windows uses a pair of CR (carriage return) and LF (line feed) characters to terminate lines. On the other hand, Unix (including Linux and Mac OS X) uses only a LF character. Therefore, problems arise when you are feeding a text file generated from a Windows program to a Unix tool (such as bash script). Since the end of the line of the input file is different from what the tools expect, you may encounter unexpected behavior from these tools. If you encounter any wired error when you run your script, you may want to run the dos2unix command in VM on your Windows-generated text file. This command converts CR and LF at the end of each line in the input file to just LF. Type dos2unix --help to learn how to use this command.
In the rest of Task 2, you will explore some of the basic text processing techniques such as tokenization, stemming, and stopword removal. These techniques are usually applied to each document prior to indexing it. Tokenization is the process of segmenting a stream of words (such as a document) into a sequence of units called tokens. Loosely speaking, when tokenization is performed on the word level, the tokens will be the words in the document. For example, a simple tokenizer might split the string up into words wherever it encounters a whitespace or punctuation. It is the ability to tokenize and analyze words, that helps elasticsearch perform exceedingly well on natural language data.
Typically, after tokenization is performed, a number of text altering techniques may be applied on the tokens in order to perform more effective and efficient retrieval. These techniques include:
Analyzer in Elasticsearch. Elasticsearch gives us a number of alternative analyzers that we can use depending on our need. Here are a few in-built analyzers provided by Elasticsearch:
Read the pages from Mapping and Analysis through Complex Core Field Types (Important!! Do not skip this reading) to learn the key concepts related to Elasticsearch Analyzer. These pages also explain how you can specify a particular Analyzer to index your documents.
Note: 1. The pages assume that your Elasticsearch contains the indices created from the dataset at https://gist.github.com/clintongormley/8579281. This would be the case if you finished earlier reading. 2. The pages use the string type for all indexed text fields, which is no longer recommended.
Starting from version 5.0, text is the recommended type for any indexed text field as this page explains.
Now build a new index for Task 2B which uses the
whitespace analyzer. When you build your index for this task, make sure that
whitespace analyzer for every field of the document, including the _all field (as explained in the Search Lite page, _all field is automatically generated by Elasticsearch to support simple queries with no field specifier (a.k.a. Search lite))
Note: Specifying the analyzer for the _all field is slightly different from other regular fields. See this page to learn how you can correctly set the analyzer for the _all field without getting any error.
If your index is built correctly, the index should return the following number of matching documents for the given queries:
| Query | # matching docs |
|---|---|
| information retrieval | 343 |
| the matrix | 62493 |
| algebra | 26 |
| elasticity | 3 |
| elizabeth | 0 |
| April 5 | 2635 |
| wrestler | 21 |
Note that the query "elizabeth" does not return any matching documents because our query is in lowercase. Since the whitespace analyzer does not perform lowercase conversion, Elasicsearch will not consider "Elizabeth" and "elizabeth" as the same tokens.
Add the sequence of your Elasticsearch commands to build the second index to the build.sh script.
Sometimes, we may want to specify transformations beyond in-built analyzers. In such cases, we can build our own custom analyzers that combine the appropriate character filters, tokenizers and token filters.
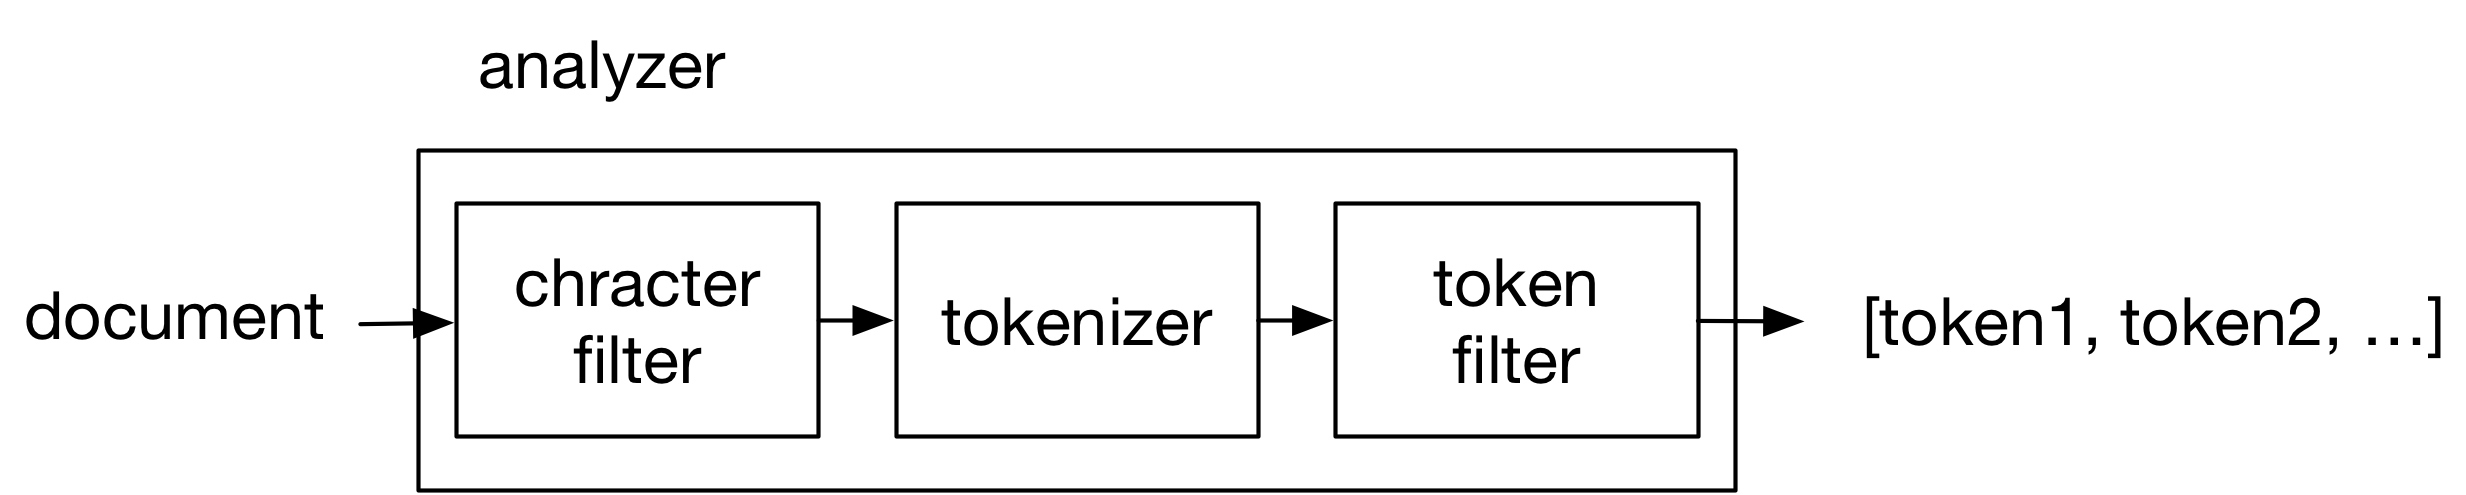
Any Analyzer in Elasticsearch consists of three transformation subprocesses, called character filters, tokenizers, and token filters as is depicted in the following diagram and as you learned from the Analysis and Analyzers page.
All incoming documents go through a (set of) chracter filter(s), which transforms individual characterers, then a tokenizer which splits incoming stream of chracters into a sequence of tokens and a (set of) token filter(s), which transforms the output tokens from the tokenizer.
Read the Custom Analyzer page to learn how you can synthesize your own custom analyzer by combining available filters and tokenizers in Elasticsearch. Once your custom analyzer is created and named, you can use it by specifying its name as the analyzer of a field (as part of themapping as you did in Task 2B).
In this task, build a custom analyzer that consists of the following filters and tokenizer:
_english_ list, which are "a, an, and, are, as, at, be, but, by, for, if, in, into, is, it,
no, not, of, on, or, such, that, the, their, then, there, these,
they, this, to, was, will, with".(Note: The final output are dependent on the order in which the filters are applied. It is important that you specify the list of token filters exactly in the above order to obtain the result that we describe later.)
_all field. For each filter/tokenizer used for the custom analyzer, use its default setting.
If your index is built correctly, the index should return the following number of matching documents for the given queries:
| Query | # matching docs |
|---|---|
| information retrieval | 788 |
| the matrix | 25 |
| algebra | 74 |
| elasticity | 23 |
| elizabeth | 203 |
| April 5 | 3487 |
| wrestler | 111 |
Note that in Task 2A, the query "the matrix" returned 62496 hits, while it returns 25 hits here. This is because in Task 2A, all documents that contain either "the" or "matrix" are matched, while here, only the documents with "matrix" are matched due to stopword removal. Also, notice that the query "elasticity" returns more documents here than in Task 2A. This is because of stemming. Documents with the word "elastic" is also considered a match when stemming is applied to documents.
Once you are done, please add the sequence of your Elasticsearch commands to build the new index to the provided build.sh script.
{ "query": "algebra", "description": "all pages related to algebra", "pages": ["https://simple.wikipedia.org/wiki/Algebra", "https://simple.wikipedia.org/wiki/Linear_algebra"]}
The first URL in the "pages" field should be what you judge as the "most relevant page" to the query. For every query of your choice, add a line like the above (10 lines in total), ending each line with the curly brace "}"
Your project must be submitted electronically before the deadline through CCLE. Navigate to Projects on left of the page, and click on the Project 1 submission section. If you submit multiple times, we will grade only the latest submission.
project1.zip, created using a zip compression utility (like using "zip -r project1.zip *" command in the VM).
You should submit this single file project1.zip that has the following packaging structure.
project1.zip
    |
    +- GetWebpage.java
    |
    +- ParseJSON.java
    |
    +- build.sh
    |
    +- task3.txt
    |
    +- any other file that is needed by your build.sh
    |
    +- README.txt (Optional)
Four key files in your zip file, GetWebpage.java, ParseJSON.java, build.sh, and task3.txt should meet the following requirements:
cs246@cs246:~$ ./p1_test.sh project1.zip(if your project1.zip file is not located in the current directory, you need to add the path to the zip file before project1.zip. You may need to use "chmod +x p1_test.sh" if there is a permission error.)
You MUST test your submission using the script before your final submission to minimize the chance of an unexpected error during grading. Again, you are likely to get zero point if the grader encounters an error during grading that could have been easily avoided if you test your zip file using our script. Please ensure that the Elasticsearch service is running before you execute the script. When evertything runs properly, you will see an output similar to the following from the grading script:
Compiling GetWebpage.java...
Testing GetWebpage.java...
SUCCESS!

Running build.sh...

Testing Task2A...
SUCCESS!

Testing Task2B...
SUCCESS!

Testing Task2C...
SUCCESS!